Search This Blog

Monday, February 22, 2010

How to install the Recovery Console in Windows XP


Recovery Console provides the means for administrators to perform a limited range of tasks using a command line interface. Its primary function is to enable administrators to recover from situations where Windows does not boot as far as presenting its GUI.

Steps:.
  • Insert the Windows XP CD into the CD-ROM drive
  • Click Start, and then click Run
  • In the Dialog box, type 'd:\i386\winnt32.exe /cmdcons' without quotes, where d is the drive letter for the CD-ROM drive. In the case of 'Microsoft Windows XP Professional x64 Edition, type d:\amd64\winnt32.exe /cmdcons where d is the drive letter for the CD-ROM drive
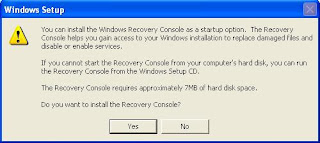
  • A Windows Setup Dialog Box appears. The Windows Setup Dialog Box describes the Recovery Console option. To confirm the installation, click Yes


  • Now if you have internet connection, select the first option 'Connect to the internet on my own'. Otherwise select the other option and click Next


  • Now follow the instruction for installation on the screen
  • Restart the computer. The next time that you start your computer, "Microsoft Windows Recovery Console" appears on the startup menu


Fwd: How to Hides all Control Panel items

Ever want to know how to remove control panel applets? According to Microsoft, the Group Policy Editor can be used to "Hides all Control Panel items." Before we get started I want to inform you that this tweak does not prevent the control panel applets from running, they just do not show up in control panel any more.

1. Click on the start button and select run.

2. In the text box type gpedit.msc and press OK.

3. Once the Group Policy Editor is open, expand the User Configuration folder if it is not already expanded.

4. Next, expand the Administrative Templates folder and then click on the Control Panel folder.

5. Select Show only specified Control Panel Applets from the right window pane and right click on it and select Properties.

6. A dialog box will open and select the enable radio button.

7. Once you have clicked on the enable radio button, the show button will be enabled, click it.

8. A new window will pop up that will display control panel objects that are OK to show. Items not on this list will not be displayed in control panel when this

feature is enabled. To add a applet to the list so that it will show up in control panel, Click Add.

9. Once the add dialog box pops up, enter the name of the control panel applet you want to be displayed. This is were it gets a little tricky. You have to enter

the filename of the applet you want shown. For example, if you want to show the System Properties applet, then you need to enter sysdm.cpl in the box.

10. Then click OK once you have entered the file name; click OK once more to exit the control panel applets settings.

11. Exit Group Policy editor and restart if needed.


Set the Hostname in Linux system


The hostname is the name by which your Linux instance "knows itself." By convention the hostname correlates to a machine-specific domain name pointed to your server. Some applications require that your hostname is set before they will function properly.

To see what your hostname is currently set to, issue the following command:

hostname

To set the hostname, we recommend creating an /etc/hostname file that contains the hostname of the current machine. You can accomplish this with the following command:

echo "lollipop" > /etc/hostname

In this example, "lollipop" is the desired hostname of the machine. Now, issue the following command to set the hostname:

hostname -F /etc/hostname

Some distributions, notably Arch Linux, set the hostname by specifying it in the /etc/rc.conf file. If this is the case for your system, set the hostname by editing the "HOSTNAME=" line so that it reads:

HOSTNAME="lollipop"

The hostname will be set the next time your system boots.


SSH Server on Windows

In the office SSH access is firewalled based on the external IPs that each PC has and I'm often dragged away from my desk to view issues on other people's PCs etc…

I wanted to be able to SSH out to servers from my laptop or the machine I'm visiting but I needed to somehow tunnel the traffic via my external IP so the firewalls would let me through.

My work PC (being Windows) didn't just have an SSH service and connecting via RDP is overkill most of the time as it resizes windows and struggles with anything I had on my 2nd monitor.

I found and installed FreeSSHd which gave me the ability to have an SSH and Telnet service running which when connected gave me a remote command prompt but naturally I was then back to the lack of an SSH client (that was command prompt friendly) on my PC.

So I installed Cygwin (making sure it installed the OpenSSH package), Cygwin adds some Linux functionality to the normal command prompt so it basically filled in the gaps whilst not bridging or NAT'ing with my network interface like the also running andLinux
(systray linux kernel, good for using KDE/Gnome apps like Kate etc…) or my Centos virtual machine. That meant that connections in and out just worked.

Now I can Telnet or SSH to my PC from anywhere on the internal network and access firewalled systems on the move.


Enabling Windows 7 God Mode

Create a new folder (right-click and click on "New Folder"). Right-click on the folder and click on rename, copy and paste this: GodMode.{ED7BA470-8E54-465E-825C-99712043E01C}

Your Admin password is lost??? No problem, XP has the security hole!!!!

Hi Folks, U Forgot Your Administrator Password and Can't Log On to Windows XP? No Problem....

If that's your only problem, then you probably have nothing to worry about. As long as you have your Windows XP CD, you can get back into your system using a simple but effective method made possible by a little known access hole in Windows XP.

This method is easy enough for newbies to follow – it doesn't require using the Recovery Console or any complicated commands. Here's how with a step-by-step description of the initial Repair process included for newbie's.

1. Place your Windows XP CD in your cd-rom and start your computer (it's assumed here that your XP CD is bootable – as it should be - and that you have your bios set to boot from CD)

2. Keep your eye on the screen messages for booting to your cd Typically, it will be "Press any key to boot from cd"

3. Once you get in, the first screen will indicate that Setup is inspecting your system and loading files.

4. When you get to the Welcome to Setup screen, press ENTER to Setup Windows now
5. The Licensing Agreement comes next - Press F8 to accept it.

6. The next screen is the Setup screen which gives you the option to do a Repair.

It should read something like "If one of the following Windows XP installations is damaged, Setup can try to repair it"

Use the up and down arrow keys to select your XP installation (if you only have one, it should already be selected) and press R to begin the Repair process.
7. Let the Repair run. Setup will now check your disks and then start copying files which can take several minutes.

8. Shortly after the Copying Files stage, you will be required to reboot. (this will happen automatically – you will see a progress bar stating "Your computer will reboot in 15 seconds"

9. During the reboot, do not make the mistake of "pressing any key" to boot from the CD again! Setup will resume automatically with the standard billboard screens and you will notice Installing Windows is highlighted.

10. Keep your eye on the lower left hand side of the screen and when you see the Installing Devices progress bar, press SHIFT + F10. This is the security hole! A command console will now open up giving you the potential for wide access to your system.

11. At the prompt, type NUSRMGR.CPL and press Enter. Voila! You have just gained graphical access to your User Accounts in the Control Panel.

12. Now simply pick the account you need to change and remove or change your password as you prefer. If you want to log on without having to enter your new password, you can type control userpasswords2 at the prompt and choose to log on without being asked for password. After you've made your changes close the windows, exit the command box and continue on with the Repair (have your Product key handy).

13. Once the Repair is done, you will be able to log on with your new password (or without a password if you chose not to use one or if you chose not to be asked for a password). Your programs and personalized settings should remain intact.

I tested the above on Windows XP Pro with and without SP1 and also used this method in a real situation where someone could not remember their password and it worked like a charm to fix the problem. This security hole allows access to more than just user accounts. You can also access the Registry and Policy Editor, for example. And its gui access with mouse control. Of course, a Product Key will be needed to continue with the Repair after making the changes, but for anyone intent on gaining access to your system, this would be no problem.

And in case you are wondering, NO, you cannot cancel install after making the changes and expect to logon with your new password.

Cancelling will just result in Setup resuming at bootup and your changes will be lost.

Ok, now that your logon problem is fixed, you should make a point to prevent it from ever happening again by creating a Password Reset Disk. This is a floppy disk you can use in the event you ever forget your log on password. It allows you to set a new password.

Here's how to create one if your computer is NOT on a domain:

Go to the Control Panel and open up User Accounts.
Choose your account (under Pick An Account to Change) and under Related Tasks, click "Prevent a forgotten password".
This will initiate a wizard.
Click Next and then insert a blank formatted floppy disk into your A: drive.
Click Next and enter your logon password in the password box.
Click Next to begin the creation of your Password disk.
Once completed, label and save the disk to a safe place
How to Log on to your PC Using Your Password Reset Disk

Start your computer and at the logon screen, click your user name and leave the password box blank or just type in anything. This will bring up a Logon Failure box and you will then see the option to use your Password Reset disk to create a new password. Click it which will initiate the Password Reset wizard. Insert your password reset disk into your floppy drive and follow the wizard which will let you choose a new password to use for your account.

Note: If your computer is part of a domain, the procedure for creating a password disk is different.

How to Speed Up Windows 7?

Ways to Speed up Windows 7fast Windows 7

Windows 7, supposedly the faster of the operating systems from Microsoft, shows gradual signs of slowing down when continually used over a long stretch.

Before installing this operating system on your computer, you should make sure that your computer meets the following basic requirements:

  • Processor: 1 Ghz or faster 32-bit (x86) or 64-bit (x64)
  • RAM: 1 GB (32-bit) or 2 GB (64-bit)
  • Available Hard Disk Space: 16 GB (32-bit) or 20 GB (64-bit)
  • Graphics Device: DirectX 9 with WDDM 1.0 or a higher driver
If your computer meets the aforementioned requirements then you can go ahead and install Windows 7 on your computer.
Steps:
  • Shutting-it-down:The proper system configuration is a necessity for the speedy functioning of the system, but again it is not the only factor effecting the computer's performance. The system tends to slow down even if used over a prolonged period of time. As such, you should make sure that you give your computer a bit of "rest" at least once every week and completely shut it down.
  • Periodically delete the temporary files from your PC: This helps the applications to run faster on your system. For this type %Temp% in the run dialog box and press "OK". A new folder will open up with the name "Temp" on the top menu bar. Here click Edit–>Select All and then File–>Delete.
  • Perform a scandisk: This test checks if your drive is in a healthy condition and also helps your computer run faster.
  • Defragment the drives:Even though Windows 7 is said to be the smarter and more efficient OS, it still suffers from disk fragmentation when involving allocation of free space to files on a magnetic disk. Consequently, more time is spent when inputting/outputting the files when the disk is highly fragmented. Thus, a regular disk defragmentation is necessary.To defragment the disk goto Start–>All Programs–>Accessories–>System Tools–>Disk Defragmenter. Here, you can select the volume to be defragmented and the click "Analyze" and then "Defragment" to begin the disk defragmentation.You can select to defragment the volume one by one or all at once.

Classic Windows Tips

1.Toggle between apps: Use Alt-Tab to switch open programs without touching your mouse. The oldest--and still the best--Windows timesaver.

2.Navigate app windows: Press Ctrl-Tab to cycle through an application's windows (or through a Web browser's tabs). First cousin of the tip above, and probably the most underrated tip ever.

3.When in doubt, type it out: If you don't want to hunt through nested menus and the like, you can access most functions, applets, or files the old-fashioned way--by entering them into the Search box. Type Calculator, Control Panel, or even the name of a piece of music on your hard drive, and press Enter.


Folder Options4.Full-frontal folders: In Windows Explorer, click Folder Options (located under the Organize menu) to reveal hidden files, show the full path in the title bar, display file extensions, and more.

5.Unobtrusive updates: Keep your OS current by opening Windows Update (Automatic Update in XP) and setting it to Download updates but let me choose whether to install them. (To get there, press the Windows key and type Windows Update.) That way, you won't have Windows urging you to restart when you don't want to (or worse, triggering a restart when you're away from the PC with an unsaved document open).

Customize Start Menu6.Tweak your taskbar: Right-click the Taskbar and choose Properties to find options for switching to the old Start menu, choosing which icons show in the notification area, setting default programs to appear in the Start bar menu, and more.

7.Partition, partition, partition: Make backups and restores easier by partitioning your hard drive and keeping one partition for the OS and the other for your documents and data.

Character Map8.Make your text special: Need a special character such as © or á? Press the Windows key and type character map in the field to bring up an app that will let you copy and paste the characters you need.

9.Simple screen capture: Take a screenshot by pressing Print Screen, which copies an image of your full screen to your clipboard so that you can paste it into Paint or your preferred image editor. To capture just the active window, use Ctrl-Alt-Print Screen. For more fine-tuned controls, try Screenshot Captor.

10.Take a shortcut: Right-click on any application icon, bring up the Properties menu, and click the Shortcuts tab. You can specify a keystroke combination to start your application here. Our personal favorite: Making a shortcut for Windows 7's Snipping Tool makes screenshots much easier. (Windows 7 only)

Sticky Keys11.Sticky keys (the good kind): Holding down two keys at once--such as Ctrl-C to copy--is a royal pain. Press the Shift key five times to start Sticky Keys, a feature that allows you to initiate a keyboard shortcut by merely pressing Shift, Ctrl, Alt, or Windows instead of holding that particular key down. Press Shift five more times to toggle Sticky Keys off.

12.Line 'em up: Want to arrange two (or more) windows side by side in Windows XP or Vista? Hold down Ctrl and click on the desired windows in the taskbar; then right-click the taskbar and select Tile Vertically. In Windows 7, you can simply drag any open window to the right or left edge of your screen and then let go.

13.Instant classic (control panels): Miss Windows' old Control Panel, which conveniently displayed all of its items at once? In Windows XP and Vista, just open the Control Panel and select Switch to Classic View. In Windows 7, click the View by drop-down menu in the upper-right corner and select your preference.


Speed Up Your Services

1.Manage the Task Manager: Windows' built-in Task Manager (press Ctrl-Alt-Del and click Task Manager) is great for seeing what your system is up to, but power users will prefer Process Explorer, which shows more details that can help you find a memory leak or troubleshoot a pesky DLL problem.

2.Nudge your network: If you have network problems, try opening the command prompt (enter cmd in the Start menu's search box) and typing ipconfig /renew to reset your network connection.

Indexing Options3.Index this, not that: The Windows Search indexer speeds up built-in search functions, but the indexing process itself can consume system resources at inconvenient times. Open Indexing Options in Control Panel (or press the Windows key and type Indexing Options). The resulting dialog box will let you specify which folders or types of data are indexed to avoid bogging down your PC needlessly.

System Configuration4.Clean up your startup: If your PC drags its feet during the startup process, press the Windows key and type msconfig to open the System Configuration utility. Check in the Startup tab to see what your machine is loading. Your computer might be loading services or apps that you don't need or want to use on startup.

Shared Folders5.Sharing is caring: For a little assistance in tracking your shared folders, right-click My Computer (or Computer in Windows 7) and click Manage to bring up the Computer Management tool. Then click Shared Folders to see a list of all of your machine's shared folders, file-sharing sessions, and open files.


Essential Add-Ons for Windows XP

1.Look, Ma, no mouse: XP users should grab Launchy, a free keyboard-driven launcher application that allows you to access programs, files, and even Websites with just a few keystrokes. (Vista and Windows 7 users get the same functionality from the Start menu's search tool.)

Revo Uninstaller2.Cleaner than you found it: To make sure that your programs uninstall completely, use Revo Uninstaller--it's often more thorough than the programs' own supplied uninstaller routines.

3.Annoyance buster: If you're tired of User Account Control dialog boxes popping up all the time in Windows Vista, but you don't want to disable the security feature completely, grab TweakUAC to set it to Quiet Mode. Windows 7 has its own UAC controls, but can still benefit from TweakUAC.

4.Get your hands dirty with Greasemonkey: Optimize your Web browsing with Greasemonkey for Firefox, an add-on that lets you choose among thousands of user-designed scripts for blocking ads, changing the layouts of popular sites, and more. (Variants also exist for Internet Explorer, Chrome, and Safari.)

Work Your Windows Key

Windows key


5.Lock your doors (and Windows): Stepping out for a minute? Remember to press Windows-L to lock your computer's screen so that no one can nose around without entering your account password.

6.Run, Windows, run: To access the Run command easily, press Windows-R.

7.Keyboard explorer: Want to open a new Windows Explorer window without leaving the keyboard? Press Windows-E.

8.Declutter your desktop: Access your desktop instantly by pressing Windows-D to hide all open windows. Press Windows-D again to return to where you were.


How to Reset / Recover Forgotten Windows NT / 2000 / XP / 2003/VISTA Administrator Password?


Forgetting your Windows administrator login password. With no way to get into the system, you can't even perform basic maintenance, let alone a thorough tune-up. Formatting is always an option, but we consider that a last resort. (Plus, guess who's going to have to help reinstall all the programs lost after a wipe?) But all hope is not lost. There are a few ways to actually retrieve a lost Windows account password. Read on, and we'll show you the light.

1st Method:


The first thing which you check if you forget login password. When we install Windows, it automatically creates an account "Administrator" and sets its password to blank. So if you have forget your user account password then try this:

Start system and when you see Windows Welcome screen / Login screen, press ctrl+alt+del keys twice and it'll show Classic Login box. Now type "Administrator" (without quotes) in Username and leave Password field blank. Now press Enter and you should be able to log in Windows.

Now you can reset your account password from "Control Panel -> User Accounts".

Same thing can be done using Safe Mode. In Safe Mode Windows will show this in-built Administrator account in Login screen.

2th Method:

There are a lot of Windows password revealers and crackers available.


Windows password recovery tool:


but I've found that Windows Password Recovery Tool is the most effective.:

it not only supports XP, 2000, and NT, I have personally tested it with Vista Home Premium and Ultimate. It works perfectly to reset any local user account to a blank password.

http://www.windowspasswordsrecovery.com


You can use the ISO to burn a boot CD. Follow these instructions:

1. Download ISO file from http://www.windowspasswordsrecovery.com Windows Password Recovery Tool

2. Burn to a CD using a CD burning tool such as Nero or Roxio or MagicISO

3. Insert CD into drive and reboot.

4. You may have to select an option in the BIOS to get the computer to boot from the CD.

Booting up and clearing a password takes a minute or two works like a charm.


pwdump2:

http://razor.bindview.com/tools/files/pwdump2.zip

How to Hack Password of any Operating System

One thing any hacker should know is how to hack into log in account of any operating system. Major Operating Systems that are used these days are Windows, Linux and Mac. So today I will show you how to hack into these Operating Systems. Are you curious how easy it is for someone to gain access to your computer? If so, read on to see the technique one might use to figure out your computer password.
Windows

Windows being very popular has a lot of programs available which can be used to hack the log in password. One of the most successful program is Ophcrack, and it is free. Ophcrack is based on Slackware, and uses rainbow tables to solve passwords up to 14 characters in length. The time required to solve a password? Generally 10 seconds. The expertise needed? None.

Simply download the Ophcrack ISO and burn it to a CD (or load it onto a USB drive via UNetbootin). Insert the CD into a machine you would like to gain access to, then press and hold the power button until the computer shuts down. Turn the computer back on and enter BIOS at startup. Change the boot sequence to CD before HDD, then save and exit.

The computer will restart and Ophcrack will be loaded. Sit back and watch as it does all the work for your. Write down the password it gives you, remove the disc, restart the computer, and log in as if it were you own machine.

You can download OphCrack from the following link:

http://ophcrack.sourceforge.net/ (http://ophcrack.sourceforge.net/)

Linux

Linux is an operating system which is quickly gaining popularity in mainstream, but not so common that you're likely to come across it. Though Mac and Linux are both based on Unix, it is easier to change the password in Linux than it is OS X.

To change the password, turn on the computer and press the ESC key when GRUB appears. Scroll down and highlight 'Recovery Mode' and press the 'B' key; this will cause you to enter 'Single User Mode'.

You're now at the prompt, and logged in as 'root' by default. Type 'passwd' and then choose a new password. This will change the root password to whatever you enter. If you're interested in only gaining access to a single account on the system, however, then type 'passwd username' replacing 'username' with the login name for the account you would like to alter the password for.
Mac

Finally we take on Mac's OS X which as we said earlier is based on Unix and is difficult to change password compared to Linux but nothing is impossible to be hacked.

The easiest method would be to use Ophcrack on this also as it works with Mac and Linux in addition to Windows. However, there are other methods that can be used, as demonstrated below.

If the Mac runs OS X 10.4, then you only need the installation CD. Insert it into the computer, reboot. When it starts up, select UTILITIES > RESET PASSWORD. Choose a new password and then use that to log in.

If the Mac runs OS X 10.5, restart the computer and press COMMAND + S. When at the prompt, type:

fsck -fy

mount -uw /

launchctl load /System/Library/LaunchDaemons/
com.apple.DirectoryServices.plist

dscl . -passwd /Users/UserName newpassword

That's it. Now that the password is reset, you can login.